How to create a personal website blog with Vue, Vuetify, and Nuxt
Vue is a popular front-end framework for building user interfaces and single-page applications. Vuetify is a UI library that provides a set of components and styles based on the Material Design specification. Nuxt is a high-level framework that simplifies the development of Vue applications by providing features such as server-side rendering, file-system routing, and static site generation.
This post will demonstrate and outline how to create something similar to my website which you can view the code for on github since it is public like most of my projects.
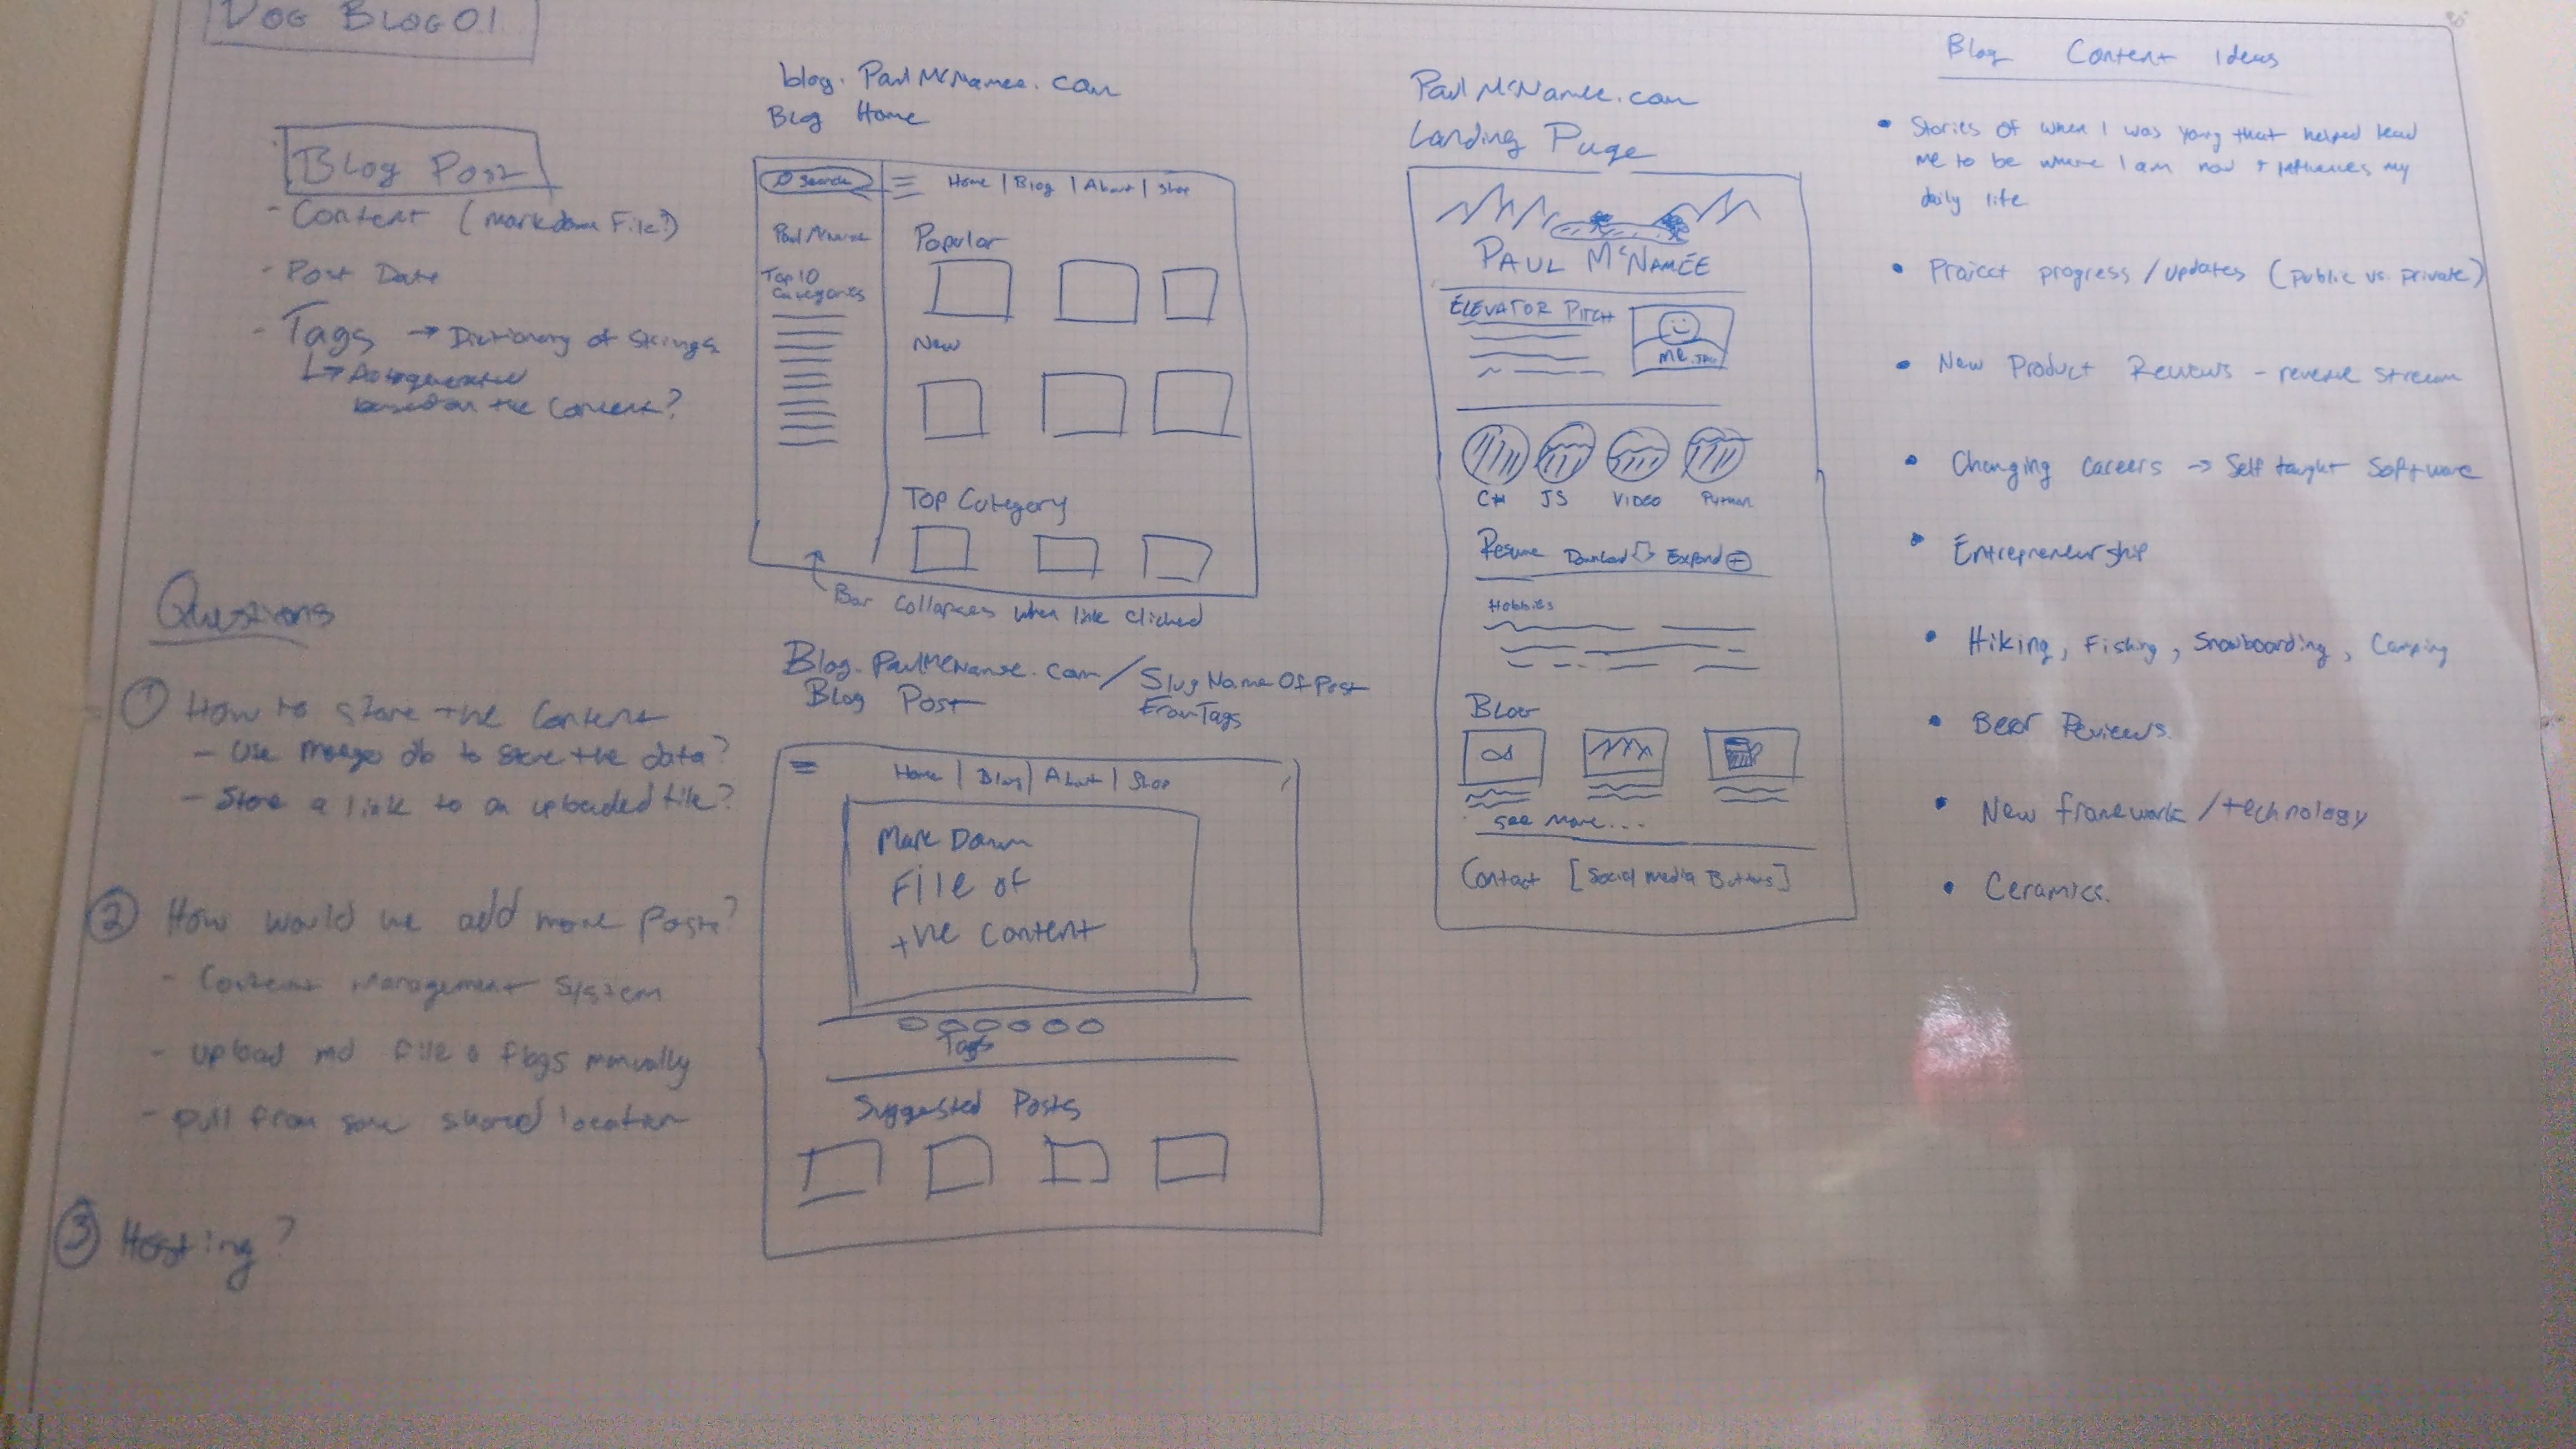
I started with this mockup for my personal website, it is a good idea to sketch out your ideas ahead of time so you can have a better understanding what your end goal will be even if it is just a rough sketch like my original mockup:
In this blog post, I will show you how to create a personal website blog with Vue, Vuetify, and Nuxt. You will learn how to:
- Scaffold a Nuxt project with TypeScript support
- Install and configure Vuetify as a Nuxt module
- Create layout and page components for your blog
- Fetch and display blog posts from a mock API
- Deploy your blog to Netlify
Prerequisites
To follow along with this tutorial, you will need:
- Node.js (version 14 or higher) and npm (version 6 or higher) installed on your machine
- A code editor of your choice (I recommend Visual Studio Code)
- A basic understanding of Vue, Vuetify, and Nuxt concepts
Step 1: Scaffold a Nuxt project with TypeScript support
The easiest way to create a Nuxt project is to use create-nuxt-app, a CLI tool that generates a boilerplate code for you. To use it, run the following command in your terminal:
1npx create-nuxt-app nuxt-blog
2
You will be prompted to answer some questions about your project. Choose the following options:
- Project name: nuxt-blog
- Programming language: TypeScript
- Package manager: npm
- UI framework: None
- Nuxt.js modules: None
- Linting tools: ESLint, Prettier
- Testing framework: None
- Rendering mode: Universal (SSR / SSG)
- Deployment target: Static (Static/JAMStack hosting)
- Development tools: jsconfig.json (Recommended for VS Code)
After the project is created, navigate to the project folder and install the dependencies:
1cd nuxt-blog
2npm install
3
To enable TypeScript support in your Nuxt project, you need to install two additional packages: @nuxt/typescript-build and @nuxt/types. The former provides TypeScript support for layouts, components, plugins, and middlewares, while the latter contains TypeScript type definitions for Nuxt.
Run the following command to install them:
1npm install --save-dev @nuxt/typescript-build @nuxt/types
2
Then, add @nuxt/typescript-build to the buildModules section of nuxt.config.ts file:
1export default {
2  // ...
3  buildModules: [
4    '@nuxt/typescript-build',
5    // ...
6  ],
7  // ...
8};
9
You can also optionally install @nuxt/typescript-runtime module, which provides TypeScript runtime support for asyncData, fetch, plugins, etc. To do so, run:
1npm install --save-dev @nuxt/typescript-runtime
2
And add @nuxt/typescript-runtime to the modules section of nuxt.config.ts file:
1export default {
2  // ...
3  modules: [
4    '@nuxt/typescript-runtime',
5    // ...
6  ],
7  // ...
8};
9
You can now run your Nuxt project in development mode by running:
1npm run dev
2
You should see a message like this in your terminal:
1ℹ Listening on: http://localhost:3000/
2
If you open http://localhost:3000/ in your browser, you should see a default Nuxt page.
Congratulations! You have successfully scaffolded a Nuxt project with TypeScript support.
Step 2: Install and configure Vuetify as a Nuxt module
To use Vuetify in your Nuxt project, you need to install it as a dependency and register it as a Nuxt module. To do so, run the following command:
1npm install @invictus.codes/nuxt-vuetify@next vuetify@next vue@next vue-router@next vuex@next --legacy-peer-deps
2
This will install the latest versions of Vuetify 3 (alpha), Vue 3 (beta), vue-router 4 (beta), and vuex 4 (beta), as well as the nuxt-vuetify module that integrates Vuetify with Nuxt.
Note: At the time of writing this blog post, Vuetify 3 is still in alpha stage and may not be stable or compatible with all Nuxt features. Use it at your own risk.
Then, add @invictus.codes/nuxt-vuetify to the modules section of nuxt.config.ts file:
1export default {
2  // ...
3  modules: [
4    '@nuxt/typescript-runtime',
5    '@invictus.codes/nuxt-vuetify',
6    // ...
7  ],
8  // ...
9};
10
You can also optionally configure some Vuetify options in the vuetify property of nuxt.config.ts file. For example, you can enable treeshaking to reduce the bundle size by only including the components you actually use, or you can use a CDN to load the icons. For more details, refer to the nuxt-vuetify documentation.
1export default {
2  // ...
3  vuetify: {
4    /* vuetify options */
5    vuetifyOptions: {
6      // @TODO: list all vuetify options
7    },
8    moduleOptions: {
9      /* nuxt-vuetify module options */
10      treeshaking: true,
11      useIconCDN: true,
12      /* vite-plugin-vuetify options */
13      styles: true,
14      autoImport: true,
15    },
16  },
17  // ...
18};
19
You can now use Vuetify components in your Nuxt project. For example, you can replace the default Nuxt page with a simple Vuetify button by editing the index.vue file in the pages folder:
1<template>
2  <v-app>
3    <v-main>
4      <v-container>
5        <v-btn color="primary">Hello Vuetify</v-btn>
6      </v-container>
7    </v-main>
8  </v-app>
9</template>
10
11<script lang="ts">
12  import { defineComponent } from 'vue';
13
14  export default defineComponent({
15    name: 'IndexPage',
16  });
17</script>
18
If you save the file and refresh your browser, you should see a button!
Great! You have successfully installed and configured Vuetify as a Nuxt module.
Step 3: Create layout and page components for your blog
Now that you have Vuetify and Nuxt set up, you can start creating the layout and page components for your blog. A layout component is a special component that defines the common structure and style of your pages, such as the header, footer, navigation, etc. A page component is a component that defines the content and logic of a specific route in your application, such as the home page, about page, blog post page, etc.
Nuxt uses a file-system routing convention, which means that it automatically generates the routes for your application based on the file tree of the pages directory. For example, if you have a file named about.vue in the pages directory, it will create a route /about that renders that component. Similarly, if you have a file named _slug.vue in the pages/blog directory, it will create a dynamic route /blog/:slug that renders that component with a parameter named slug.
To create a layout component, you need to create a file named default.vue in the layouts directory and export a Vue component from it. This component will be used as the default layout for all pages unless you specify otherwise. You can use any Vuetify components inside your layout component to create the desired look and feel for your blog. For example, you can use v-app-bar, v-navigation-drawer, v-footer, etc.
Here is an example of a simple layout component for our blog:
1<template> 2 <v-app> 3 <v-app-bar app color="indigo" dark> 4 <v-app-bar-nav-icon @click="drawer = !drawer"></v-app-bar-nav-icon> 5 <v-toolbar-title>Nuxt Blog</v-toolbar-title> 6 <v-spacer></v-spacer> 7 <v-btn text to="/">Home</v-btn> 8 <v-btn text to="/about">About</v-btn> 9 </v-app-bar> 10 11 <v-navigation-drawer app v-model="drawer"> 12 <v-list nav dense> 13 <v-list-item link to="/"> 14 <v-list-item-icon> 15 <v-icon>mdi-home</v-icon> 16 </v-list-item-icon> 17 <v-list-item-content>Home</v-list-item-content> 18 </v-list-item> 19 20 <v-list-item link to="/about"> 21 <v-list-item-icon> 22 <v-icon>mdi-account</v-icon> 23 </v-list-item-icon> 24 <v-list-item-content>About</v-list-item-content> 25 </v-list-item> 26 </v-list> 27 </v-navigation-drawer> 28 29 <v-main> 30 <v-container> 31 <nuxt /> 32 </v-container> 33 </v-main> 34 35 <v-footer app color="indigo" dark> 36 <span class="white--text">© {{ new Date().getFullYear() }}</span> 37 </v-footer> 38 </v-app> 39</template> 40 41<script lang="ts"> 42 import { defineComponent, ref } from 'vue'; 43 44 export default defineComponent({ 45 name: 'DefaultLayout', 46 setup() { 47 const drawer = ref(false); 48 49 return { 50 drawer, 51 }; 52 }, 53 }); 54</script> 55
The tag is a special tag that renders the page component for the current route. You can also use tag to render nested routes.
To create a page component, you need to create a file with the desired name in the pages directory and export a Vue component from it. You can use any Vuetify components inside your page component to create the desired content and logic for your route. For example, you can use v-card, v-img, v-chip, etc.
Here is an example of a simple page component for our home page:
1<template>
2  <div>
3    <h1 class="text-h2 mb-4">Latest Posts</h1>
4    <v-row>
5      <v-col v-for="post in posts" :key="post.id" cols="12" md="6" lg="4">
6        <v-card class="mb-4" outlined link :to="`/blog/${post.slug}`">
7          <v-img :src="post.image" height="200px"></v-img>
8          <v-card-title>{{ post.title }}</v-card-title>
9          <v-card-subtitle>{{ post.date }}</v-card-subtitle>
10          <v-card-text>{{ post.excerpt }}</v-card-text>
11          <v-card-actions>
12            <v-chip v-for="tag in post.tags" :key="tag" small>{{ tag }}</v-chip>
13          </v-card-actions>
14        </v-card>
15      </v-col>
16    </v-row>
17  </div>
18</template>
19
20<script lang="ts">
21  import { defineComponent } from 'vue';
22  import { Post } from '~/types';
23
24  export default defineComponent({
25    name: 'HomePage',
26    data() {
27      return {
28        posts: [] as Post[],
29      };
30    },
31    async fetch() {
32      // Fetch posts from a mock API
33      const response = await fetch(
34        'https://jsonplaceholder.typicode.com/posts'
35      );
36      const data = await response.json();
37      // Map the data to Post type and add some dummy fields
38      this.posts = data.slice(0, 6).map((post: any) => ({
39        id: post.id,
40        title: post.title,
41        slug: `post-${post.id}`,
42        image: `https://picsum.photos/id/${post.id + 100}/600/400`,
43        date: new Date().toLocaleDateString(),
44        excerpt: post.body.slice(0, 100) + '...',
45        tags: ['Vue', 'Vuetify', 'Nuxt'],
46      }));
47    },
48  });
49</script>
50
51<style scoped lang="scss">
52  h1 {
53    font-weight: bold;
54  }
55</style>
56
In this component, we use the fetch hook to fetch some posts from a mock API and store them in a data property. Then we use a v-for directive to loop over the posts and render them as cards. We also use a link prop on the v-card component to make it navigate to the corresponding blog post page when clicked.
You can create other page components for your blog in a similar way. For example, you can create an about.vue file in the pages directory for the about page, and a _slug.vue file in the pages/blog directory for the blog post page.
Here is an example of an about page component:
1<template>
2  <div>
3    <h1 class="text-h2 mb-4">About Me</h1>
4    <p>Hi, I'm Paul.</p>
5  </div>
6</template>
7
8<script lang="ts">
9  import { defineComponent } from 'vue';
10
11  export default defineComponent({
12    name: 'AboutPage',
13  });
14</script>
15
16<style scoped lang="scss">
17  h1 {
18    font-weight: bold;
19  }
20</style>
21
And here is an example of a blog post page component:
1<template>
2  <div>
3    <v-img :src="post.image" height="400px"></v-img>
4    <h1 class="text-h2 my-4">{{ post.title }}</h1>
5    <p class="text-subtitle-1">{{ post.date }}</p>
6    <v-divider class="my-4"></v-divider>
7    <p>{{ post.content }}</p>
8    <v-divider class="my-4"></v-divider>
9    <v-chip v-for="tag in post.tags" :key="tag" small>{{ tag }}</v-chip>
10  </div>
11</template>
12
13<script lang="ts">
14  import { defineComponent } from 'vue';
15  import { Post } from '~/types';
16
17  export default defineComponent({
18    name: 'BlogPostPage',
19    data() {
20      return {
21        post: {} as Post,
22      };
23    },
24    async fetch() {
25      // Fetch the post from a mock API using the slug parameter
26      const slug = this.$route.params.slug;
27      const id = slug.slice(5);
28      const response = await fetch(
29        `https://jsonplaceholder.typicode.com/posts/${id}`
30      );
31      const data = await response.json();
32      // Map the data to Post type and add some dummy fields
33      this.post = {
34        id: data.id,
35        title: data.title,
36        slug: `post-${data.id}`,
37        image: `https://picsum.photos/id/${data.id + 100}/600/400`,
38        date: new Date().toLocaleDateString(),
39        content: data.body,
40        tags: ['Vue', 'Vuetify', 'Nuxt'],
41      };
42    },
43  });
44</script>
45
46<style scoped lang="scss">
47  h1 {
48    font-weight: bold;
49  }
50</style>
51
In this component, we use the fetch hook to fetch the post from a mock API using the slug parameter from the route. Then we render the post details as an image, a title, a date, a content, and some tags.
You have now created the layout and page components for your blog.
Step 4: Fetch and display blog posts from a mock API
In the previous step, we used a mock API (https://jsonplaceholder.typicode.com/posts) to fetch some dummy posts for our blog. This API returns an array of objects with id, title, and body properties. We mapped these objects to our Post type and added some additional fields such as slug, image, date, excerpt, and tags.
However, this is not a realistic scenario for a real blog. In most cases, you would have a backend service or a CMS that provides an API for your blog posts. The API would return the posts with all the necessary fields and in the desired format.
For example, you could use Strapi, a headless CMS that lets you create and manage your own API. You could create a collection type named Post with fields such as title, slug, image, date, content, and tags. Then you could use Strapi's REST or GraphQL API to fetch the posts from your Nuxt project.
To demonstrate how to do this, I have created a Strapi project with some sample posts and deployed it to Heroku. You can access the REST API at https://nuxt-blog-strapi.herokuapp.com/posts. You can also access the GraphQL playground at https://nuxt-blog-strapi.herokuapp.com/graphql.
To fetch and display the posts from this API, you need to make some changes to your page components. First, you need to install axios, a popular HTTP client library for JavaScript. To do so, run:
1npm install axios
2
Then, you need to register axios as a Nuxt plugin. To do so, create a file named axios.js in the plugins directory and paste the following code into it:
1import axios from 'axios';
2
3export default ({ $axios }) => {
4  // Set the base URL of your API
5  $axios.defaults.baseURL = 'https://nuxt-blog-strapi.herokuapp.com';
6};
7
Then, add plugins/axios.js to the plugins section of nuxt.config.ts file:
1export default {
2  // ...
3  plugins: ['plugins/axios.js'],
4  // ...
5};
6
You can now use $axios in your page components to make HTTP requests to your API. For example, you can modify your home page component to fetch the posts from /posts endpoint:
1<template>
2  <div>
3    <h1 class="text ```html
4    <template>
5      <div>
6        <h1 class="text-h2 mb-4">Latest Posts</h1>
7        <v-row>
8          <v-col v-for="post in posts" :key="post.id" cols="12" md="6" lg="4">
9            <v-card class="mb-4" outlined link :to="`/blog/${post.slug}`">
10              <v-img :src="post.image.url" height="200px"></v-img>
11              <v-card-title>{{ post.title }}</v-card-title>
12              <v-card-subtitle>{{ post.date }}</v-card-subtitle>
13              <v-card-text>{{ post.excerpt }}</v-card-text>
14              <v-card-actions>
15                <v-chip v-for="tag in post.tags" :key="tag.id" small
16                  >{{ tag.name }}</v-chip
17                >
18              </v-card-actions>
19            </v-card>
20          </v-col>
21        </v-row>
22      </div>
23    </template>
24
25    <script lang="ts">
26      import { defineComponent } from 'vue';
27      import { Post } from '~/types';
28
29      export default defineComponent({
30        name: 'HomePage',
31        data() {
32          return {
33            posts: [] as Post[],
34          };
35        },
36        async fetch() {
37          // Fetch posts from Strapi API
38          const response = await this.$axios.get('/posts');
39          const data = response.data;
40          // Map the data to Post type
41          this.posts = data.map((post: any) => ({
42            id: post.id,
43            title: post.title,
44            slug: post.slug,
45            image: post.image,
46            date: new Date(post.date).toLocaleDateString(),
47            excerpt: post.excerpt,
48            tags: post.tags,
49          }));
50        },
51      });
52    </script>
53
54    <style scoped lang="scss">
55      h1 {
56        font-weight: bold;
57      }
58    </style>
59  </div></template
60>
61
Notice that we use this.$axios.get('/posts') to make a GET request to the /posts endpoint. We also map the data to our Post type and use the fields from the API response.
You can also modify your blog post page component to fetch the post from /posts/:slug endpoint:
1<template>
2  <div>
3    <v-img :src="post.image.url" height="400px"></v-img>
4    <h1 class="text-h2 my-4">{{ post.title }}</h1>
5    <p class="text-subtitle-1">{{ post.date }}</p>
6    <v-divider class="my-4"></v-divider>
7    <div v-html="post.content"></div>
8    <v-divider class="my-4"></v-divider>
9    <v-chip v-for="tag in post.tags" :key="tag.id" small>{{ tag.name }}</v-chip>
10  </div>
11</template>
12
13<script lang="ts">
14  import { defineComponent } from 'vue';
15  import { Post } from '~/types';
16
17  export default defineComponent({
18    name: 'BlogPostPage',
19    data() {
20      return {
21        post: {} as Post,
22      };
23    },
24    async fetch() {
25      // Fetch the post from Strapi API using the slug parameter
26      const slug = this.$route.params.slug;
27      const response = await this.$axios.get(`/posts?slug=${slug}`);
28      const data = response.data[0];
29      // Map the data to Post type
30      this.post = {
31        id: data.id,
32        title: data.title,
33        slug: data.slug,
34        image: data.image,
35        date: new Date(data.date).toLocaleDateString(),
36        content: data.content,
37        tags: data.tags,
38      };
39    },
40  });
41</script>
42
43<style scoped lang="scss">
44  h1 {
45    font-weight: bold;
46  }
47</style>
48
Notice that we use to make a GET request to the /posts endpoint with a query parameter named slug. We also map the data to our Post type and use the fields from the API response. We also use v-html directive to render the content as HTML.
You have now fetched and displayed the blog posts from a mock API.
Step 5: Deploy your blog to Netlify
The final step is to deploy your blog to Netlify, a popular platform for hosting static websites and web applications. Netlify provides features such as continuous deployment, serverless functions, forms, analytics, and more.
To deploy your blog to Netlify, you need to:
- Create a GitHub repository for your Nuxt project and push your code to it
- Create a Netlify account and connect it to your GitHub account
- Create a new site on Netlify and select your GitHub repository
- Configure the build settings and deploy your site
Let's go through these steps in detail.
Create a GitHub repository for your Nuxt project
To create a GitHub repository for your Nuxt project, you need to:
- Go to https://github.com/new and create a new repository with the name nuxt-blog
- Copy the remote URL of your repository (e.g., https://github.com/your-username/nuxt-blog.git)
- Go to your terminal and navigate to your Nuxt project folder
- Run the following commands to initialize a local git repository, add your files, commit them, and push them to the remote repository:
1git init
2git add .
3git commit -m "Initial commit"
4git remote add origin https://github.com/your-username/nuxt-blog.git
5git push -u origin main
6
You should see a message like this in your terminal:
1Enumerating objects: 86, done.
2Counting objects: 100% (86/86), done.
3Delta compression using up to 4 threads
4Compressing objects: 100% (74/74), done.
5Writing objects: 100% (86/86), 1.03 MiB | 1.03 MiB/s, done.
6Total 86 (delta 5), reused 0 (delta 0)
7remote: Resolving deltas: 100% (5/5), done.
8To https://github.com/your-username/nuxt-blog.git
9 * [new branch]      main -> main
10Branch 'main' set up to track remote branch 'main' from 'origin'.
11
If you refresh your GitHub repository page, you should see your files there.
Create a Netlify account and connect it to your GitHub account
To create a Netlify account and connect it to your GitHub account, you need to:
- Go to https://app.netlify.com/signup and sign up with your GitHub account
- Authorize Netlify to access your GitHub account
- Confirm your email address and complete your profile
Create a new site on Netlify and select your GitHub repository
To create a new site on Netlify and select your GitHub repository, you need to:
- Click on the New site from Git button on the top right corner of the dashboard
- Select GitHub as the provider and authorize Netlify to access your repositories
- Search for nuxt-blog and select it as the repository
- Configure the build settings
The build command is npm run generate, which tells Nuxt to generate a static version of your site. The publish directory is dist, which is where Nuxt puts the generated files. The deploy mode is Git LFS, which tells Netlify to use Git Large File Storage for handling large files such as images.
- Click on the Deploy site button and wait for Netlify to build and deploy your site
You should see a successful deploy message.
Configure the build settings and deploy your site
To configure the build settings and deploy your site, you need to:
- Click on the Site settings button on the top right corner of the dashboard
- Click on the Change site name button under Site information and enter a custom name for your site (e.g., nuxt-blog)
- Click on the Save button and confirm the change
Your site is now deployed and accessible. You can also use a custom domain name if you want.
You have now deployed your blog to Netlify.
Conclusion
In this blog post, I showed you how to create a personal website blog with Vue, Vuetify, and Nuxt. You learned how to:
- Scaffold a Nuxt project with TypeScript support
- Install and configure Vuetify as a Nuxt module
- Create layout and page components for your blog
- Fetch and display blog posts from a mock API
- Deploy your blog to Netlify
I hope you enjoyed this tutorial and learned something new. If you have any questions or feedback, feel free to tell me about it and I will try to help. Thanks for reading!